How to screen record on a Mac
Press Shift-Command-5. A toolbar opens at the bottom of the screen. Click Record Entire Screen or Record Selected Portion, then click Record. To record one window, click Record Selected Window and then click the window. To stop, click the stop button in the menu bar or press Command-Control-Escape. A few seconds later the recording is on your Desktop as a .mov file. It works the same on a MacBook Air, a MacBook Pro or an iMac, and you need nothing extra to install.
Last updated: October 2026
Written by the developer of Take, a Mac screen recorder, on 7 October 2026. Every built-in step on this page was tried that day on a 16-inch MacBook Pro (Mac16,7) on macOS 27.0.1, recording a window of sample text, and the test file was deleted afterwards.
The built-in way: Shift-Command-5
- Press Shift-Command-5. The screenshot toolbar opens near the bottom of the screen.
- Pick what to record. The three buttons with a small dot are for video: Record Entire Screen, Record Selected Window and Record Selected Portion. For a part of the screen, drag the frame to the size you want.
- If you want sound, click Options and pick a microphone. On macOS 27 the same menu has Include System Audio for the sound your Mac plays.
- Click Record. For Record Selected Window there is no Record button: click the window you want and it starts.
- Stop with the stop button in the menu bar, or press Command-Control-Escape.

Shift-Command-5 on macOS 27. The three buttons with a dot record: the whole screen, one window, or a part you drag out. Record Selected Portion is picked here.
Our test: we recorded a TextEdit window of sample text for about six seconds and stopped it with Command-Control-Escape. The file appeared on the Desktop about 6 seconds after Stop, while the thumbnail sat in the corner of the screen. It was 5.7 seconds long, 671 KB, and 1504 by 1024 pixels, because a window recording keeps the window's shadow around it. Press Escape to close the toolbar without recording.
With QuickTime Player
Open QuickTime Player and choose File, New Screen Recording. On macOS 27 it opens the same toolbar as Shift-Command-5, so the steps above are the same from there. The same File menu has New Movie Recording, which records the camera, and New Audio Recording. To have your face in a corner of a screen recording, see how to record your screen and your face.
With sound
There are two sounds and two switches, both in Options. A microphone records your voice and the room. Include System Audio, on macOS 27, records what the Mac plays: a video, a call, an app's alert. It starts unticked, and with both off, a test file on our internal audio page had no sound track at all.
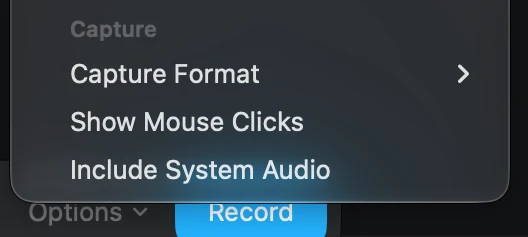
Shift-Command-5, Options, on macOS 27. Include System Audio sits under Capture, below the microphone list. It starts unticked.
If your Mac has no Include System Audio line, the free routes and what we measured are on how to screen record with internal audio.
The shortcuts
| Keys | What they do |
|---|---|
| Shift-Command-5 | Opens the toolbar to record the screen or take a screenshot |
| Command-Control-Escape | Stops a recording, from any app |
| Escape | Closes the toolbar without recording |
| Option-Command-Escape | Not a recording key: it opens Force Quit |
Apple's guide says you can change the screenshot shortcuts in System Settings, Keyboard, Keyboard Shortcuts, Screenshots. We did not change ours.
Where the recording goes
To the Desktop, named Screen Recording with the date and time, unless you pick another place under Options, Save to. On macOS 27 that choice also moves your screenshots.
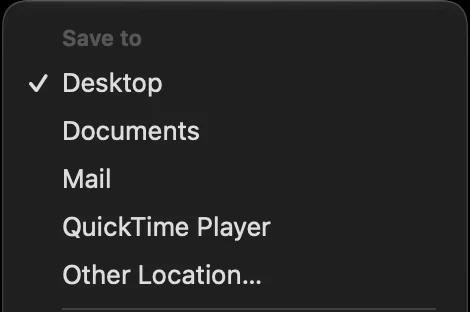
Shift-Command-5, a record button, then Options. Desktop is ticked until you pick something else.
Every choice and what it did: where do screen recordings go on a Mac.
Stopping
The stop button is a small circle with a square in it, in the menu bar. On a MacBook with a notch it sits closest to the notch, which is where icons vanish first when the menu bar is full. Command-Control-Escape works even when you cannot see it.

The stop button while recording. On our Mac it sat at the left end of the menu bar icons, closest to the notch.
Every way to stop, including when nothing else works: how to stop a screen recording on a Mac.
Is there a time limit?
Apple's guide names none, and we found none: the recording runs until you stop it. What limits it is free disk space. Movement is what makes the file big. In our measurements a minute of a still window was 3.2 MB and a minute of scrolling text was 102.8 MB, over 6 GB an hour. Before a long recording, check free space in System Settings, General, Storage. How to make the files smaller: why Mac screen recordings are so big.
If it does not work
Shift-Command-5 and QuickTime need no permission. Other recorders need their switch on in System Settings, Privacy & Security, Screen & System Audio Recording, and then a restart of the app. A black window, a silent file or a missing recording each have their own cause: screen recording not working on a Mac.
Where Take saves time
The built-in recorder gives you exactly what was on the screen, waiting and mistakes included. For a quick clip that is all you need. Take, our recorder, is for recordings other people will watch. When you stop, it has already trimmed the start and your reach for Stop, sped up the pauses where nothing moves, and zoomed in where you clicked. It records the sound your Mac plays unless you turn that off, keeps the camera as its own file so you can move the bubble afterwards, and shows the size of the file before you share it.

Our test take in Take. Cut split it at the playhead; the selected pause can play 2, 4 or 8 times faster, or at full speed.
Then everything is on one strip you can drag, cut or delete. It does not edit recordings made with other apps, and it has no share links: you get a file. We did not make a new Take recording for this page; the picture is from our test on the editing page.
Download Take to try it. Recording and editing are free to try · the 7-day trial starts when you first share · macOS 14 or later
Every Mac screen recording guide here
- Record with the sound your Mac plays
- Record your screen and your face
- Record a call and record a webinar when you are not the host
- Record a demo video that looks edited
- Stop a recording and find where it went
- Trim, cut, crop or speed it up and zoom in on part of it
- Make the file smaller or turn it into a GIF
- Fix a recording that will not start, is black or has no sound
- Read a script from under the notch
- Choosing an app: the best Mac screen recorders, recorders with no watermark and Loom alternatives
FAQ
How do I screen record on a Mac?
Press Shift-Command-5, click Record Entire Screen or Record Selected Portion, then click Record. To stop, click the stop button in the menu bar or press Command-Control-Escape. The file goes to your Desktop.
What is the shortcut to screen record on a Mac?
Shift-Command-5 opens the recording toolbar, and Command-Control-Escape stops the recording. Escape closes the toolbar without recording.
How do I screen record on a MacBook?
The same way as on any Mac: Shift-Command-5, pick the screen, a window or a part of it, and click Record. On a MacBook with a notch the stop button sits next to the notch in the menu bar.
Does a Mac have a built-in screen recorder?
Yes. Shift-Command-5 and QuickTime Player's File, New Screen Recording both record the screen for free, and on macOS 27 they open the same toolbar.
Can I screen record on a Mac with sound?
Yes. In the toolbar's Options, pick a microphone for your voice. On macOS 27, tick Include System Audio for the sound the Mac plays. Both start off.
Is there a time limit on Mac screen recording?
Apple names none. The recording runs until you stop it or the disk fills. A minute of scrolling text was about 103 MB in our test, a still minute about 3 MB.
How do I record a video of myself on a Mac?
Open QuickTime Player and choose File, New Movie Recording. That records the camera. To record the screen with your face in a corner, float that camera window over the screen and record with Shift-Command-5.
Recordings that arrive finished
Stop the capture and it is already staged: zooms where you clicked, dead air sped up, a real backdrop, and a plain .mov you own. Comes with Crest: $24.99 once for Crest Pro, Take and Minutes.
Get Take with Crest, $24.99 Try free for 7 daysmacOS 14 or later · Universal · no watermark, ever · 7-day trial, no card up front
Keep reading: Record with internal audio · Record your screen and your face · Trim, cut, crop or speed up · Screen recording file size · Turn a recording into a GIF · Loom alternatives for Mac · Best Mac screen recorders · Take overview